Make Your First Plugin with Vue JS for Photoshop and Adobe XD
Editor’s Note: “This week’s guest post is by Pragati Verma, a Full Stack Web Developer who took part in the Major League Hacking Fellowship program. Over the 12 week program, Pragati developed a Vue plugin sample for both Adobe Photoshop and Adobe XD.” — Erin Finnegan, Community Engineer, Adobe Creative Cloud

Adobe has been revolutionizing the tech space for both designers and developers for the past few years. I am glad that I had the opportunity to contribute to the amazing community by being an MLH Fellow for the Spring 2021 Cohort. During my contribution period, I worked on making a VueJS Starter Plugin for Adobe Photoshop and Adobe XD.
This article is for VueJS developers who want to get started making Photoshop or XD plugins using UXP, the Unified Extensibility Platform. Beginner developers getting started with plugin development with UXP using VueJS will also find this article helpful.
Recently, Adobe released a completely new API platform called the Unified Extensibility Platform (UXP), for creating plugins (also known as panels or Add-ons previously) in Photoshop 2021 and beyond. Let’s have a brief overview of UXP before we get started with our plugin.
What is UXP?
UXP is a platform that enables JavaScript-based plugin development with near-native performance in Photoshop and XD. It uses a shared technology stack that provides a modern, unified JavaScript execution environment along with a common set of APIs for filesystem and network access, bound with host-specific APIs for interacting with the application and the document itself. UXP gives a modern look and feel to the plugin interfaces and — more importantly — unlocks the potential for better responsiveness and speed for many operations.
What is Vue.js?
Vue is a progressive javascript framework that is mostly used for building user interfaces. It is not a requirement for making UXP-based plugins. You can get started making a vanilla JavaScript plugin following the tutorial here.
However, if you prefer fast-paced development based on your familiarity with HTML, CSS, and JS, this article is for you. If you’ve never used Vue, here’s a good place to get started. You might consider Vue for your UXP plugin for its flexibility and simple integration. Personally, I like Vue and chose this project because of the minimalism and absence of pedigree in its framework.
Let’s start developing our first VueJS based plugin in UXP.
Prerequisites
Before we start, here are the basic requirements:
- Download and Install Photoshop and XD from Adobe Creative Cloud
- Download and Install the UXP Developer Tool using the documentation
- Download and Install Node.js, Yarn, and VueJS. (Editor’s Note: If you’re a beginner, you don’t need these tools to get started. Please see this guide instead.)
Getting Started
We’ll be making a simple XD plugin that can be appended to Photoshop as well. Our plugin will create a dialog in XD, where you can see the count of clicks on the button along with a hello world message.
To begin developing plugins for Photoshop and XD, we first need to understand the required folder structure. Inside the main directory that will contain our plugin, we need to have three folders:
plugin: This folder contains all the necessary assets for the plugin like icons and amanifest.jsonthat is used to specify details about the plugin such as its name, the menu item(s) it adds to the app, and so on.
Learn about the manifest here.src: This folder contains the main source code for the plugin, essentially the javascript code that helps you build the logic for the plugin.dist: This optional folder, created automatically during the build process, is used during plugin development and contains all the files required to load or reload plugins into the UXP Developer Tool. Again, you do not need to create this folder, it is created on its own according to the webpack configuration specified for building/bundling the plugin.
So, the folder structure should look like this:
The files required for the plugin can be found here:
hello.vue :
main.js :
package.json :
manifest.json :
webpack.config.js :
Find the complete source code for the plugin on GitHub.
Now, as we’re done with the prerequisites for the plugin. Let’s take a look at how to build it and load it inside of the UXP Developer Tool.
Build Process
There are two ways to build this sample plugin for use in XD:
yarn watchornpm run watchwill build a development version of the plugin, and recompile every time you make a change to the source files. The result is placed indist.yarn buildornpm run buildwill build a production version of the plugin and place it indist. It will not update every time you make a change to the source files.
Please note: For this example, you must run either watch or build before trying to use it within XD!
Launching in XD
Add the plugin to your workspace in the UXP Developer Tool by clicking Add Plugin… and selecting dist/manifest.json.
Note: DO NOT select the manifest.json file inside the plugin folder.
Once added, you can load it into XD by clicking the ••• button on the corresponding row in the UXP Developer Tool, and clicking Load. Switch to XD and you should see the starter panels.
Voila! There’s your first plugin with VueJS for XD. It should look something like this:

How to Get the Plugin Running in Photoshop
To make the same plugin run in Photoshop, you have to make some changes to the code.
We’ll be using panels in Photoshop, therefore, the manifest.json has to be changed accordingly and we’ll be using a plugin/index.html to serve the content on a panel and also to style it.
Plus, we need to update the webpack configuration for this plugin to run in Photoshop. (If you want to display your XD dialog in a panel, read this.)
You can find the source code for these files below:
index.html :
manifest.json :
webpack.config.js :
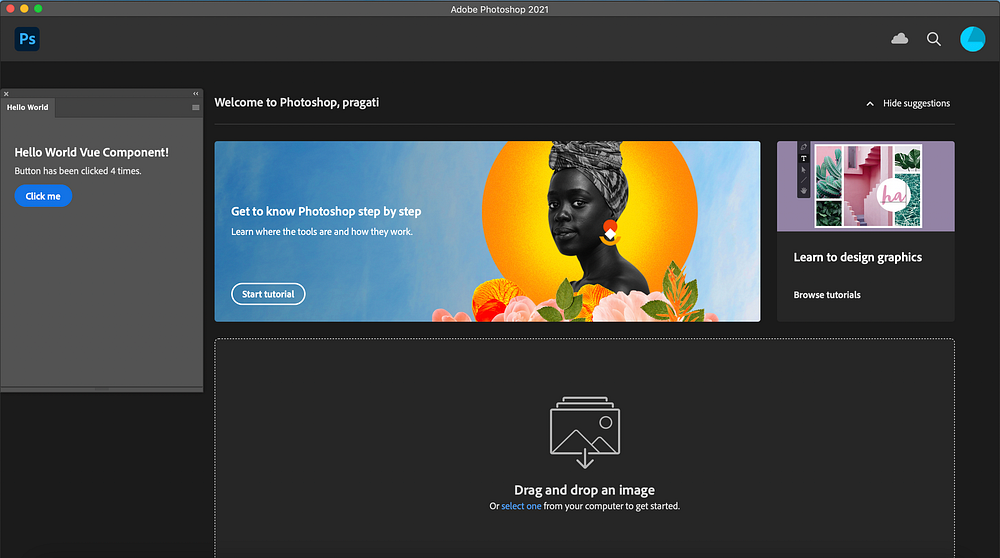
Hurray! You’re done. After making these changes, you can follow the same steps as for XD to build the plugin and then launch it in Photoshop. It would look like this:
Find the complete source code for the Photoshop plugin on GitHub.
This is just the beginning, you can create more such awesome plugins in Photoshop and XD using the UXP Developer Tool.
To learn how to build plugins for XD, visit: https://www.adobe.io/xd/uxp/develop/tutorials/
Want to build for Photoshop? Visit: https://developer.adobe.com/photoshop/uxp.
You can contribute samples, too!
I used my time as an MLH Fellow to contribute this open-source sample to the Photoshop UXP documentation repo. If you’re interested in contributing to the repo, you can, too. If you’re interested in becoming an MLH Fellow, apply for the next cohort here.
For more stories like these, subscribe to our Creative Cloud Developer Newsletter,